Features
PREVIEWS
Previews are an excellent way to tease your subscribers and get them excited for what’s behind the paywall! After all, they say a picture is worth 1,000 words.
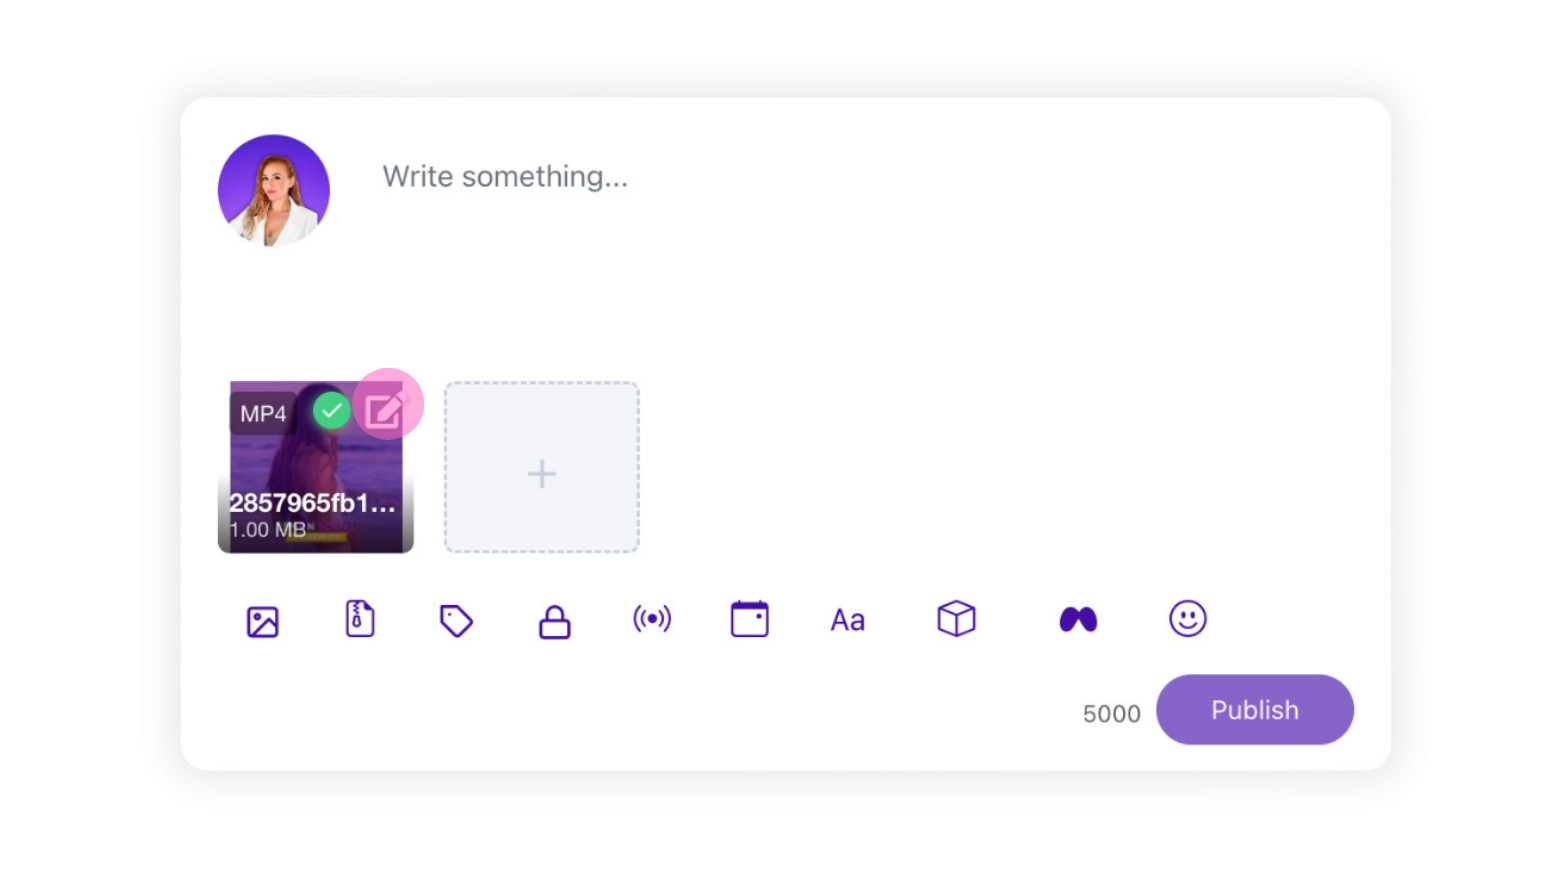
- Begin by uploading all the content you intend to sell behind the paywall into your post or direct message (DM).
- Craft an engaging caption to accompany your content. Remember, the caption remains visible to subscribers regardless of whether you choose to provide a preview.
- Determine the price for your content. Note that previews are only applicable to posts or DMs with a set price and are not intended for free posts or free DMs.
- Locate and click on the white pencil icon situated in the top right corner of any of your images or videos.
- For photos or videos, upload the desired image or video file to display as your preview. Alternatively, if selecting a preview for a video file, utilize the slider to choose any segment and duration of the video you want to showcase as the free preview.
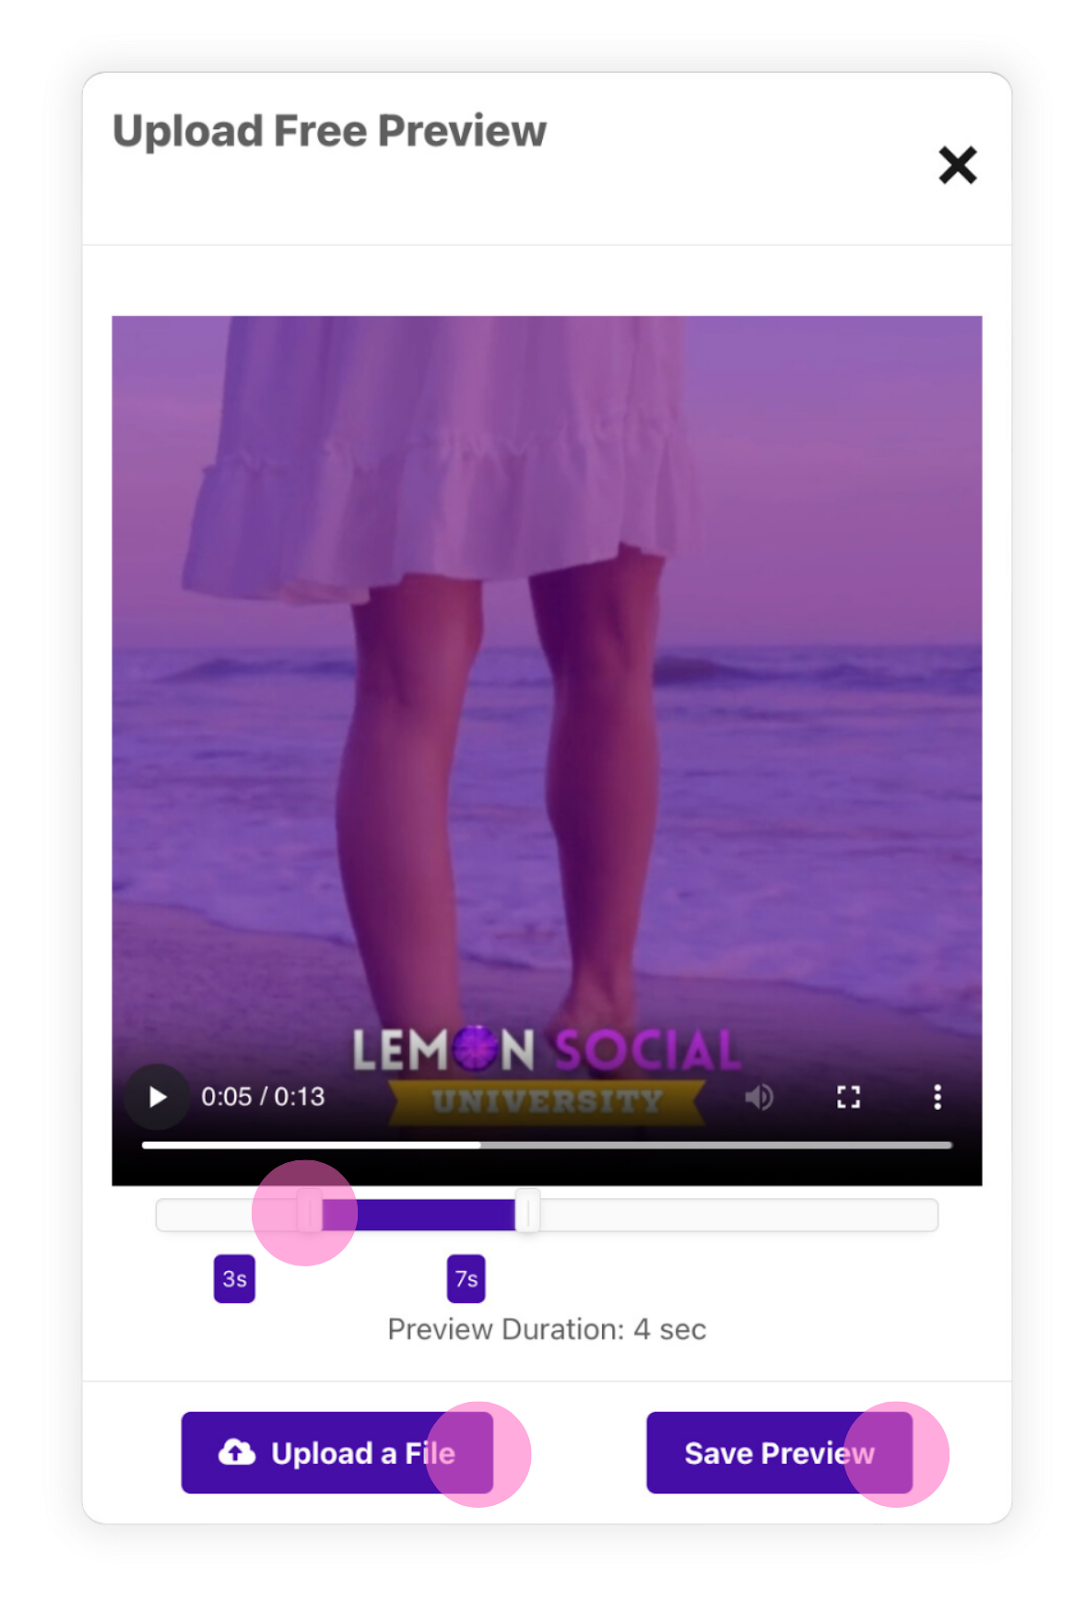
- Once satisfied with your selection, click on "Save Preview," and you're all set!
_________________________________________________________________________________________________________________________________
WELCOME MESSAGES
A well-crafted welcome message with unlockable photos or videos is not just a fun feature, but it’s also a strategic tool that creators can leverage to provide a great first impression, enhance audience engagement right off the bat, ensure subscriber loyalty, and stand out as a creator who goes the extra mile for their subscribers in the online adult content creation world.
Here’s a quick guide on how to set up your welcome message:
- Go to your profile page and locate the option "Edit My Page" at the top right corner.
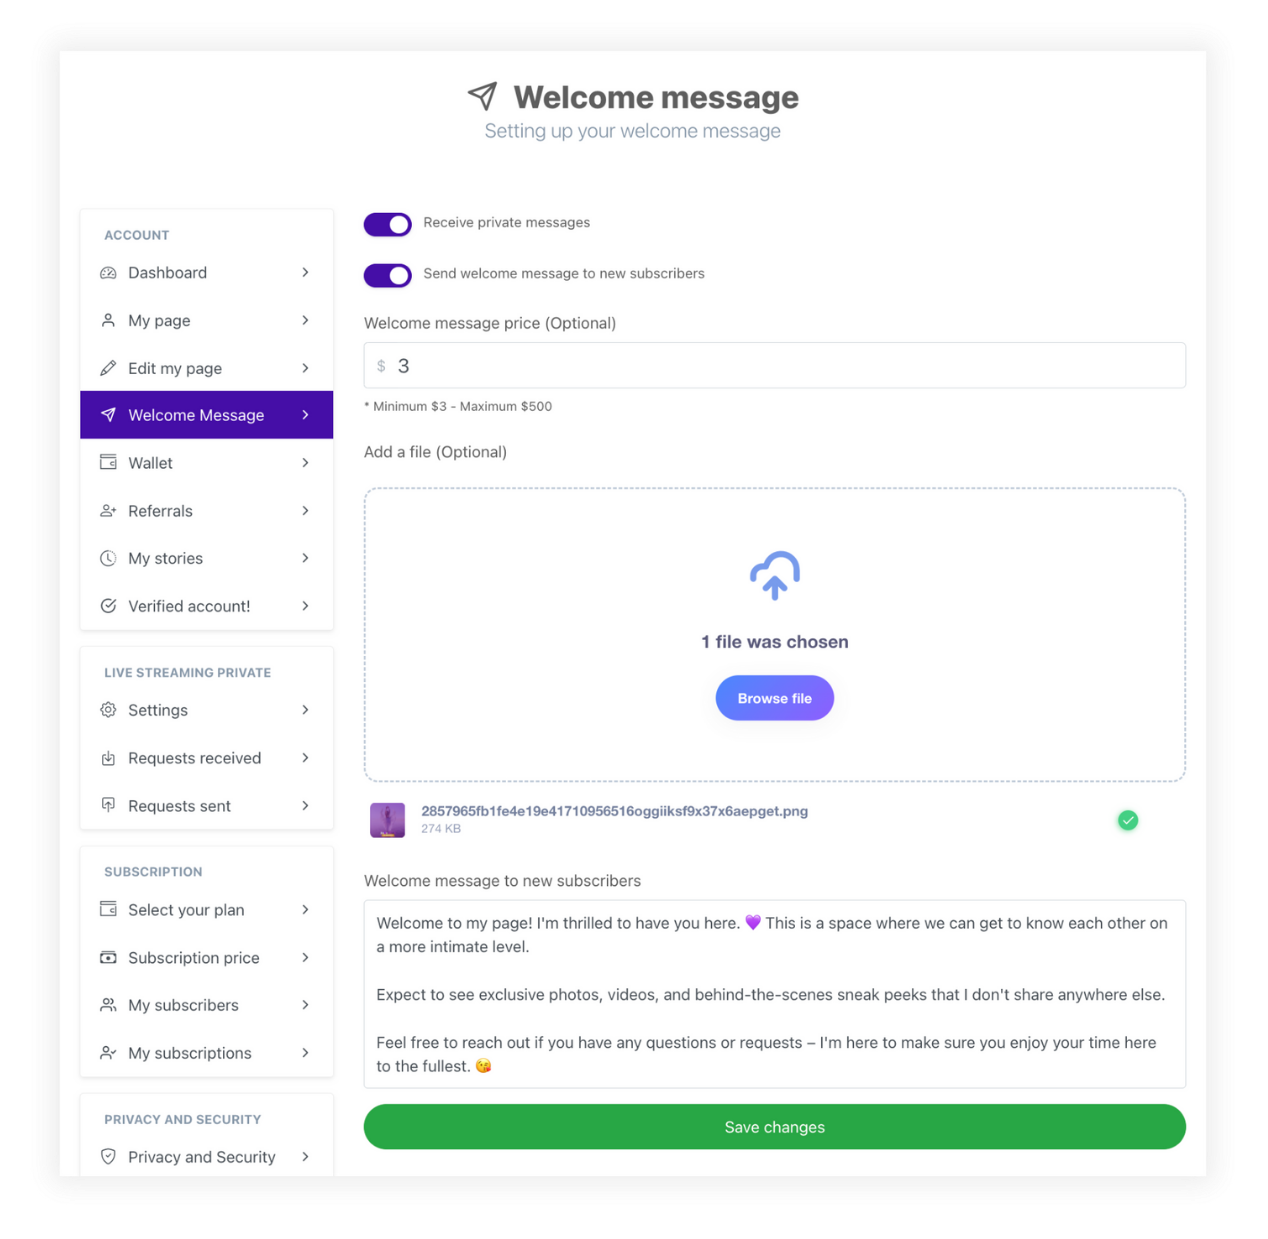
- Find and click on "Welcome Message" in the menu on the left-hand side.
- Switch the toggle next to "Send welcome message to new subscribers" to the ON position.
- Decide whether to set a price for your welcome message or keep it free of charge.
- Upload your desired photo or video file by selecting "Browse File".
- Compose your welcome message in the designated text area.
- Once you're done, click on "Save Changes" to confirm the modifications.
_________________________________________________________________________________________________________________________________
PRIVATE LIVE STREAMING
Private 1-on-1 livestreams are a great way to offer an exclusive, one-of-a-kind experience to your subscribers and increase your earning potential while operating within the safety of the platform.
- Go to your profile page and locate the option "Edit My Page" at the top right corner.
- Find and click on "Settings" under the section Private Live Streams in the menu on the left-hand side.
- Switch the toggle next to "Allow private live streaming " to the ON position.
- Set your price per minute to anything between $1 and $100 (keep in mind subscribers are required to book minimum 10 minutes).
- Click “Save Changes”
Now subscribers are able to request private 1-on-1 livestreams with you.
Once a subscriber sends you a request, you’ll need to either accept or decline that request within 48hrs or the request will expire, and the money will be refunded to the subscriber. Your subscriber will also be refunded if you choose to decline the request.
To manage requests from your Desktop device, follow the instructions below:
- Locate the option "Edit My Page" in the top right corner.
- Find and click on "Requests Received" under the section Private Live Streams in the menu on the left-hand side.
To manage requests from your Mobile device, follow the instructions below:
- Click on the 3 bars in the top right corner of your screen and locate the option “Edit My Page” from the dropdown menu.
- Click on the “Menu” button with 3 bars and navigate to the section Private Live Streams and click on “Requests Received.”
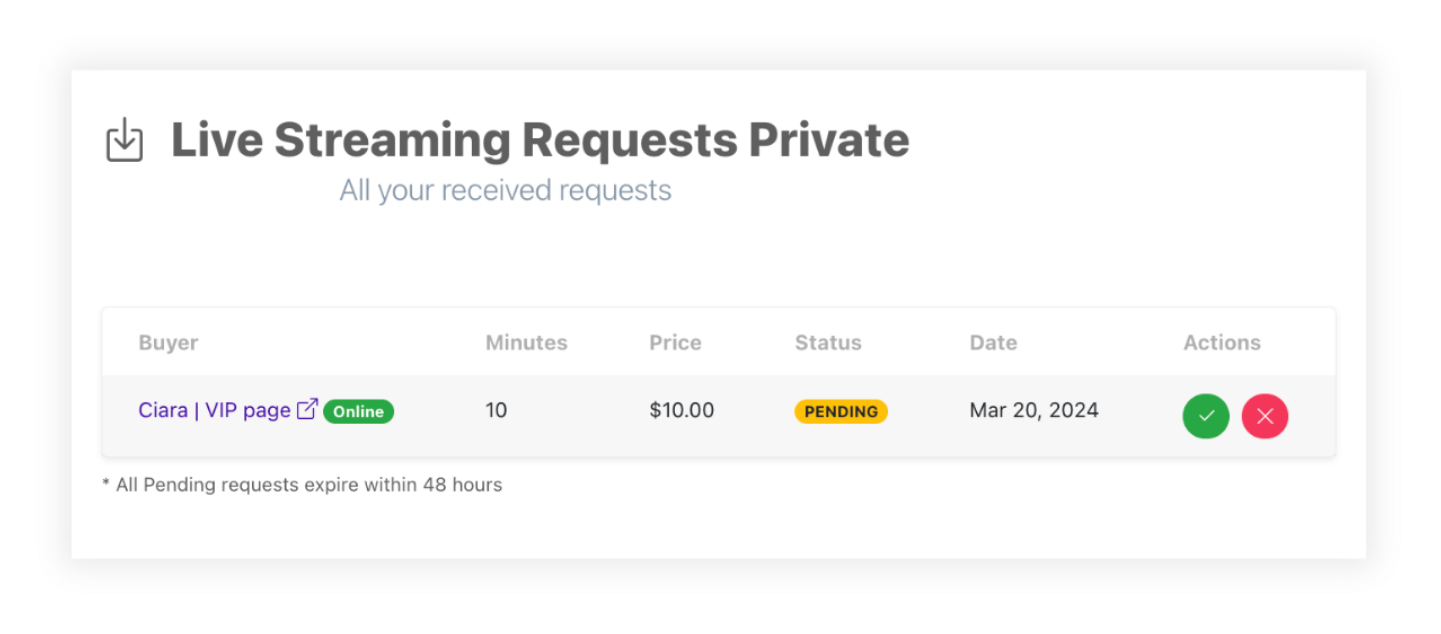
Here you’ll be able to view your private livestream requests and view all of the relevant details including the user requesting the call and their online status, total time requested, total price, status, date requested, and the option to Accept or Decline.
It’s important to keep in mind that you should only accept the request when you’re ready to start the call.
_________________________________________________________________________________________________________________________________
SCHEDULING
The Post Scheduling feature, represented by a calendar icon, offers creators the ability to plan and organize their content in advance, ensuring timely and consistent posting across the platform. This feature can be accessed from the several locations throughout the site:
- New Post: When creating a new post, you can locate the scheduling feature directly within the posting interface.
- Direct Messages (DMs): It's also accessible when sending a mass DM, allowing users to schedule messages for delivery at specific times.
- Side Menu Bar: Additionally, users can access the scheduling feature through the side menu bar from the Creator Tools dropdown menu, providing quick and convenient navigation and allowing you to see an overall calendar view of your published wall feed content and DMs as well as upcoming scheduled content.

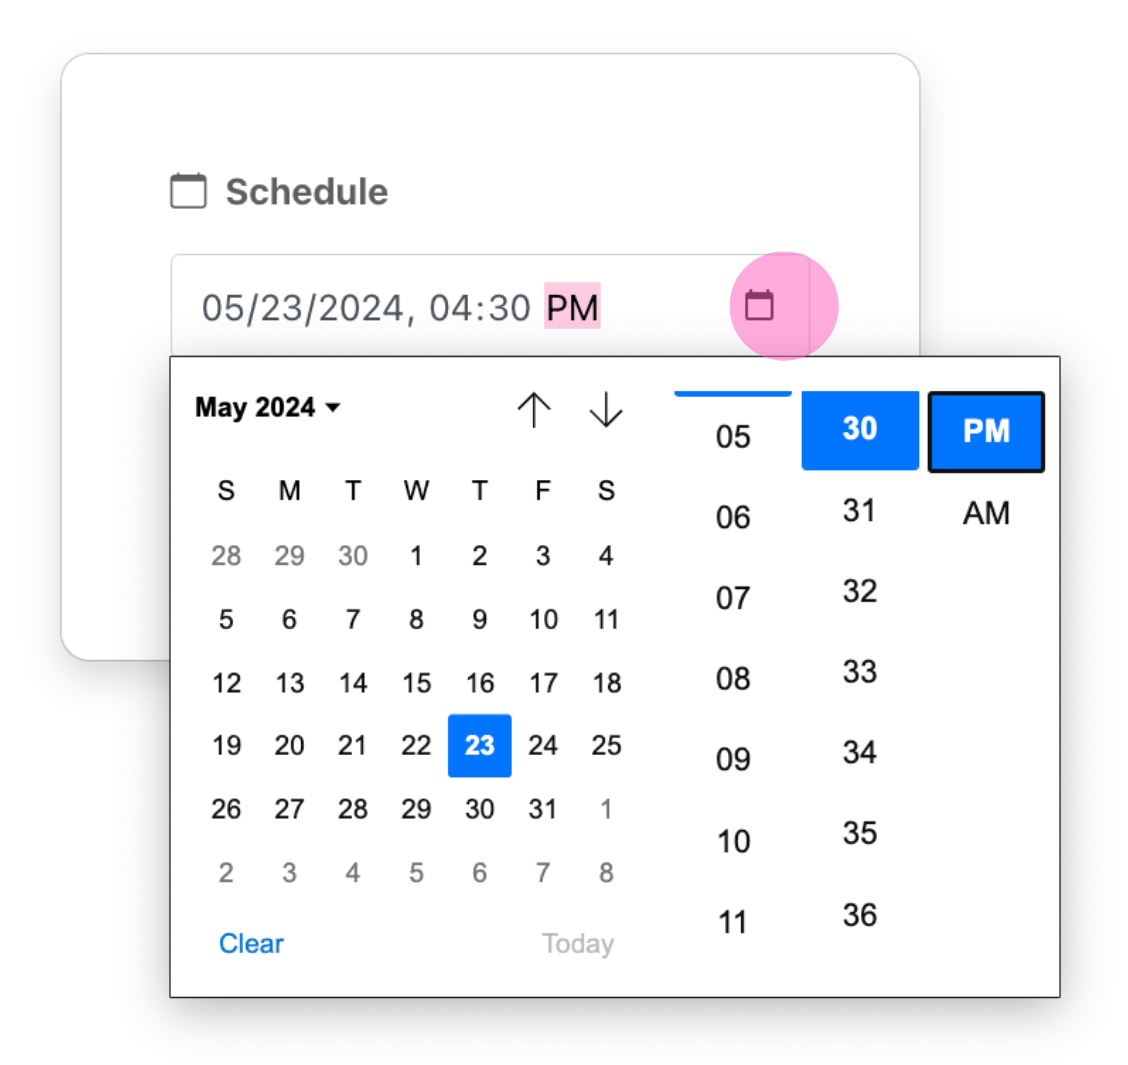
With the scheduling feature, users can effortlessly set the date and time for their posts or messages, helping them maintain a consistent presence and engage with their audience effectively. By planning content in advance, users can streamline their workflow and ensure their content reaches their audience at optimal times.
_________________________________________________________________________________________________________________________________
SUBSCRIBERS
Managing your subscribers is a crucial part of staying organized in the content creation world. Knowing which subscribers are willing to pay top dollar for content, just like to browse, prefer sexting, have kinks or fetishes and other specifics help you as a content creator to cater to individual users’ fantasies and desires. Being able to provide that individualized experience and give them your undivided attention in a way they are comfortable greatly helps your subscribers connect with you and increase your earnings.
Here’s a how-to guide on efficiently managing your subscribers:
- Navigate to the dropdown menu under Creators Tools and locate “Subscribers”
- Here you can see an overview of all of your subscribers and their data including how much they have spent broken down by individual paywall categories, date they’ve been subscribed since, date their subscription renews or cancels and any notes you have on them.
- You can create new categories using the “Create Category” button located in the top right.
- Once you have created your categories, all you have to do to organize your subscribers is click on the three dots in the corner of their card and select “Add to category” and place them in the category of your choice.
- You can also edit their name and add notes to their card as needed. This is especially important if they have shared a lot of personal details about themselves and you need a way to make a note of their preferences, likes, dislikes, kinks, etc.
Don’t worry, subscribers can never see your categories or personal notes on them!
_________________________________________________________________________________________________________________________________
SETTING UP YOUR METAMASK
Setting up and connecting your Metamask wallet is incredibly simple. Here’s a quick how-to guide that explains the process:
Install the MetaMask Extension:
- Visit the official MetaMask website at https://metamask.io/.
- Click on the "Download" button and choose the extension that corresponds to your web browser (Chrome, Firefox, Brave, or Edge).
- Follow the on-screen instructions to add the MetaMask extension to your browser.
Create a New Wallet:
- Once the extension is installed, click on the MetaMask icon in your browser's toolbar.
- Click on "Get Started" and then choose "Create a Wallet."
- Set up a strong password for your wallet.
Backup Your Seed Phrase:
- After setting the password, MetaMask will display a 12 or 24-word seed phrase. Write down this seed phrase on paper or copy and paste into a document and keep it stored securely.
- Do not share your seed phrase with anyone, as it's the key to accessing your wallet.
Confirm Your Seed Phrase:
- MetaMask will ask you to confirm your seed phrase by selecting the words in the correct order. This ensures that you've correctly written down your seed phrase.
Access Your Wallet:
- Once your seed phrase is confirmed, you'll have successfully created your MetaMask wallet. You can now access your wallet and manage your Ethereum and Polygon assets.
The next step is adding Ethereum (ETH) or Polygon (MATIC) to your MetaMask. Follow the instructions below:
Switching Networks:
- Open your MetaMask wallet by clicking on the extension icon in your browser.
- At the top of the MetaMask window, you'll see the current network (e.g., "Main Ethereum Network"). Click on it to open the network selection menu.
Add Ethereum (ETH):
- To add the Ethereum network, choose "Custom RPC."
- For the Ethereum mainnet, enter the following details:
- Network Name: Ethereum Mainnet
- New RPC URL: https://mainnet.infura.io/v3/YOUR_INFURA_API_KEY
- ChainID: 1
- Currency Symbol: ETH
- Block Explorer URL: https://etherscan.io/
- Click "Save" to add the Ethereum mainnet to your MetaMask.
Add Polygon (MATIC):
- To add the Polygon network, choose "Custom RPC."
- For the Polygon mainnet, enter the following details:
- Network Name: Polygon Mainnet
- New RPC URL: https://rpc-mainnet.matic.network
- ChainID: 137
- Currency Symbol: MATIC
- Block Explorer URL: https://explorer.matic.network/
- Click "Save" to add the Polygon mainnet to your MetaMask.
Switch Between Networks:
You can now switch between the Ethereum and Polygon networks by selecting the desired network from the network selection menu in MetaMask.
Once you've added both Ethereum and Polygon networks to your MetaMask wallet, you can manage your assets and interact with decentralized applications on both blockchains. Remember to have some ETH in your wallet to cover transaction fees on the Ethereum network.
________________________________________________________________________________________________________________________________MINTING NFTs
Minting NFTs is a great way to get involved in the Web3 space and generate additional income as a creator. Here’s a quick how-to guide on navigating the NFT space in Lemon Social.
How to Mint NFTs on Lemonsocial.io (Generic Guide):
- Visit nft.lemonsocial.com
- Open your web browser and navigate to nft.lemonsocial.com
- Create an Account:
- First click login with the wallet. You will then be connected and able to click on your profile icon and go to account settings. Upload a new avatar and create an account.
- Log In:
- After creating your account, log in using your wallet.
- Navigate to NFT Creation:
- Once logged in, find and click on a link or button that says "Create NFT" or something similar. This might be in your user dashboard or a specific section related to NFTs.
- Upload Artwork/Content:
- Look for an option to upload the digital file of your artwork or content. This file will be the basis for your NFT.
- Provide Details:
- Fill in necessary details about your NFT, such as title, description, and any other metadata. This information helps buyers understand your creation better.
- Set Parameters:
- Decide on the parameters of your NFT, such as edition size (number of copies), resale, and any other customization options provided by Lemon Social.
- Preview and Confirm:
- Review the information you've entered and preview how your NFT will appear. Confirm that everything is accurate.
- Set Pricing:
- If the platform allows, set the pricing for your NFT. This can include both the initial sale price. Once the nft is minted you need to list it and set the price either on an auction or set price then click set and it will pop open the wallet to sign the transaction.
- Mint Your NFT:
- After finalizing all details, look for a button or option to "Mint" your NFT. This process essentially turns your digital file into a unique token on the blockchain.
- Confirmation and Blockchain Transaction:
- Depending on the platform, there might be a short processing time as the minting transaction is confirmed on the blockchain. Be patient and wait for the confirmation.
- View Your Minted NFT:
- Once the minting process is complete, you should be able to view your minted NFT on the platform. It will now be available for sale or display in your profile.
Remember, these steps are general guidelines, and the actual steps may vary based on the specific features and interface of Lemonsocial.io or any other platform you choose. Always refer to the platform's official documentation or support for the most accurate and up-to-date information.
_________________________________________________________________________________________________________________________________
LEMON SOCIAL TV (LSTV)
Lemon Social TV, also referred to as LSTV, is a free social media platform featuring original content from Lemon Social creators. This is a great place to share your SFW content and reach potential subscribers! Think of it as an outlet to share more of your personal life or behind the scenes content. On LSTV you can find everything from cooking channels, life hacks, dance lessons, content creation tips, travel vloggers, lifestyle influencers, and more!
Get the most out of your LSTV content by posting relevant videos that are engaging to your viewers and turn them into paying subscribers!
Head over to LSTV using the link in your side menu and start growing your audience!
Please note: LSTV is only for SFW content, meaning there cannot be any nudity, implied nudity, or sexually explicit content. We also do not allow any illegal content. Support or praise of terrorism, organized crime or hate groups is not tolerated. Offering sexual services; buying or selling live animals, firearms, alcohol, tobacco products, or non-medical or pharmaceutical drugs is also prohibited. Any content that promotes the use of non-medical drugs, graphic violence, self-injury, hate speech, bullying, or abuse will also be removed from LSTV. We have a zero-tolerance policy when it comes to sharing sexual content involving minors or threatening to post intimate images or videos of others.
________________________________________________________________________________________________________________________________
LEMON SOCIAL UNIVERSITY
Welcome to Lemon Social University, your comprehensive hub for adult content creation! Join our vibrant community of seasoned professionals and aspiring creators alike. Here, you'll find invaluable feedback, resources, and guidance from both fellow members and our dedicated team of content creator coaches. Our mission is to cultivate a diverse community focused on transparency and empowering creators to maximize their earning potential.
Whether you're seeking advice on photography techniques, monetization strategies, sexting tips, or collaboration etiquette, we've got you covered.
Here's a sneak peek of what Lemon Social University offers:
- Direct access to experienced content creators for personalized guidance.
- One-on-one and group coaching sessions tailored to your needs.
- Engaging courses, learning modules, and blog content.
- Free promotion on our social media platforms.
- Access to a library of resources, from financial tools to equipment recommendations.
- Participation in community discussions and forums.
- Learning from industry experts to enhance your income stream.
- Forging meaningful connections and collaborating with fellow creators.
Join Lemon Social University today and let’s spice up your content creator journey!
________________________________________________________________________________________________________________________________